
MAST LIFTING FRAME
 |
 |
 |
 |
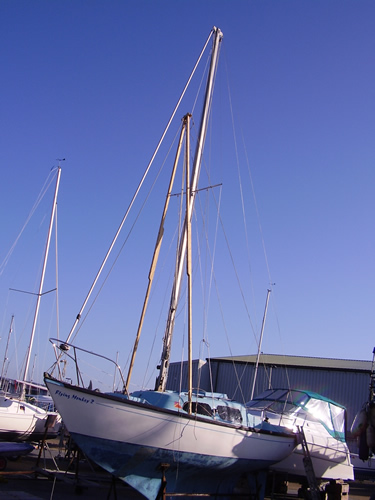
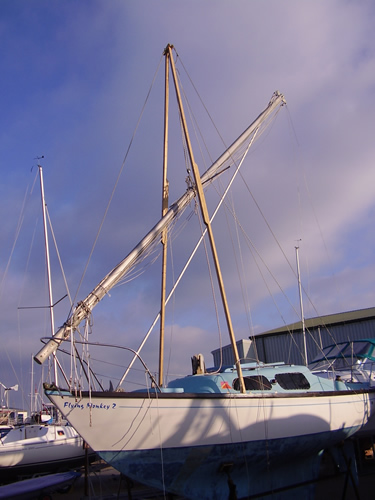
These pictures show
Howard Cogan's A-frame being used to lower the mast on Keith Gibson's
H22 Flying Monkey II.
Click on a
picture to see a larger version
Faced
with the regular problem of dropping and raising the mast on my Hurley
22 every season, I felt that there had to be a more convenient (and
cheaper) alternative to being dependant on when the crane visited the
boatyard. I knew it was possible to buy a basic
" A " frame for this, but it seemed a lot for what it was
and the quoted capacity was considerably greater than I needed.
I therefore decided to look into the feasibility of making my own. It needed obviously to be capable of safely supporting the weight of my mast and rigging, which I estimated at about 100 pounds. I can comfortably lift it on my own, and I'm not that big. It also had to be portable. Initial back-of-an-envelope calculations using Eulers strut equation indicated that 2x2 timber should be adequate (50mm x 50mm). I apologize for using imperial units, but that is how I was taught and all the material data that I still have is also in Imperial. The end result is still the same.
The analyses of the final design was as follows :-
Each leg was 228 inches and the timber was actually 1.75 x 1.75 inches, planed.
Euler gives the failure load as (9.87EI)/ (LxL)
Thus for my proposal would be L=228; Young's Modulus E=1.6x1000,000; Section Modulus I=0.782. All in imperial units.
This gave a failure load of 237 pounds per leg, or 474 for both.
This also ignored the fact that the middle section of each leg was doubled over a length of 3feet 6 inches and should therefore be stiffer. I wanted a minimum safety factor of 4 and this seemed ok. The slight angle of the legs increased the load by about 3%, and was neglected.
The final design comprises four lengths of 2x2 planed alround timber,
pin jointed using 6mm coach bolts. Each leg of the "A" being
in two parts, which hinge on one bolt through 180 degrees for transport
and are, then locked in place by two further bolts to give a nominal
length of 19 feet. This has to be well above the cross trees to leave
room for a block and tackle plus a strop.
The top the legs are joined, again using bolts, this time 6mm eyed bolts and two short pieces of 2x1 inch timber. A third eye bolt passes through the middle of the cross pieces on the opposite side to the first two. These are to make fixings for the thee ropes, which will hold the top of the frame in position. Two to the rear, which are secured to the rear cleats, and one to the front secured on the central cleat.
For further security I fitted two eyebolts at the foot of each leg to make it easy to lash the legs to the base of the forward stanchions to prevent the frame from skidding on the deck. The whole thing can be transported on a car roof rack and then unfolded on site.
I managed to find a pair of suitable pulleys to make a four to one block and tackle at a boat jumble and with a new piece of rope for the pulley block the whole thing was less than £30 .
The first time I tried it I checked that it would support the load prior to actually hanging the mast on it and it has been used several times since. I have since seen a proprietary unit used , and it was identical in the way it worked except that only had one rope to the stern . Having two can give a bit more freedom to adjust things if required during the operation .
This design is simple and there are more ways of doing it for sure , but it works for me .Should anyone else wish to make their own , I do not accept responsibility for its suitability and recommend that they proof test it prior to using it in anger .
To lower the mast.
I have found that two people can do it , and the mast can be controlled with one hand .
1.
Raise the "A" frame using a spare halyard and strop . Fit
downhall to the strop to enable it to be pulled back down . The frame
is in front of the mast .
2. Put the two rear guys through the gap between the spreaders and the
shrouds .
3. Lash the feet of the frame to the base of the stanchions level with
the mast .
4. Secure the front guy to the foremost cleat and then adjust the length
of the guys so that the frame leans slightly forward from the mast,
5. Disconnect all electrical connections , tidy and secure all halyards
,ropes etc to leave the mast ready to lift.Remove the split pins from
all bottle screws and it can help to remove the guard rails at the bow
.
6. Disconnect the LOWER shrouds and tie them back against the mast .
7. Tie a loose strop around the mast outside the now loose shrouds and
haul this up to the spreaders to support the mast .
8. Loosen the remaining bottle screws .
9. Take the weight of the mast on the pulley block and remove the bolt
at the foot of the mast .
10. Now disconnect the bottle screws and lower the mast . This is easier
with two people . The mast will move forward as its centre of gravity
will want to hang under the frame . This can be controlled manually
or by a rope . If a furler is fitted this will need to be controlled
and guided clear of the frame .
11. When removing the frame, lower it prior to undoing the lashing at
the feet . If not it may well tip uncontrollably when they are undone
!
To raise the mast reverse the procedure .
The most tricky part is dealing with the foil from the furler but it can be done . If there is a third person present , it's worthwhile giving them the sole task of looking after it .
Howard
Cogan